


Ways Repaired Wood Fence Gates Stay Strong
Here is a striking fence repair fact. Wood held below about 20 percent moisture has a useful safety margin against fungal decay. Yet decay fungi grow well when wood moisture reaches about 28 to 30 percent. Therefore, repaired wood fence gates must control water as carefully as they control weight. USDA research explains this range.
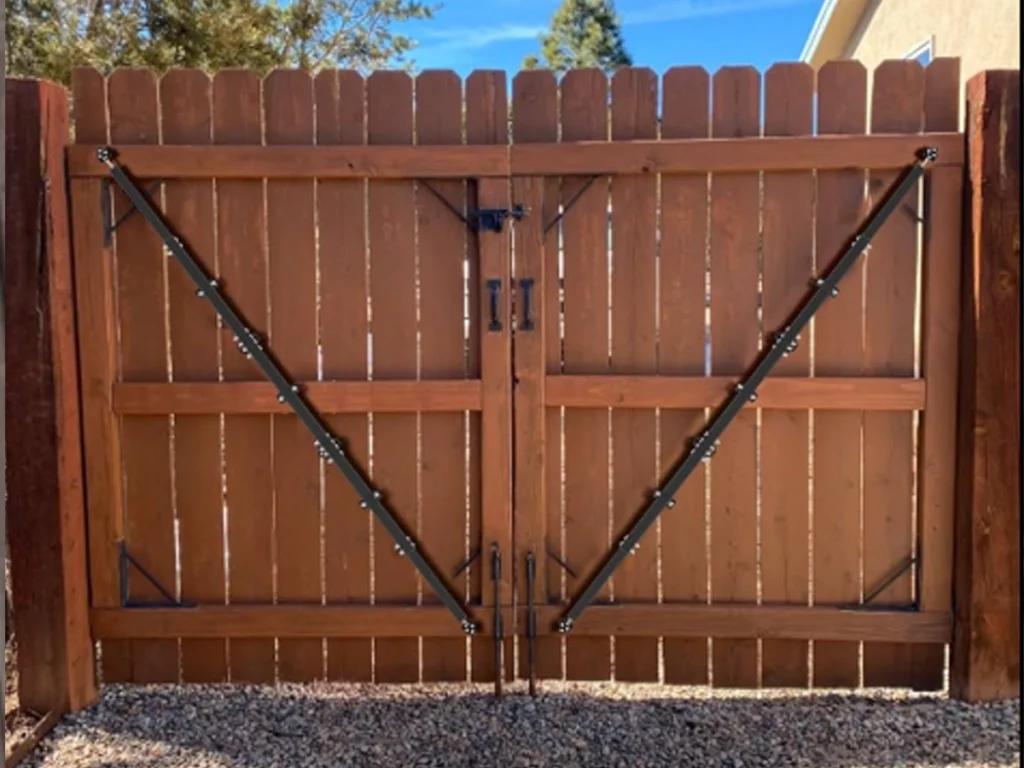
AI Overview: 5 Clear Answers for a Safer, Stronger Gate
- Start with the post, because a sound gate cannot stay square on a moving support.
- Control frame shape, brace direction, hardware strength, water entry, and final alignment as one system.
Repaired wood fence gates stay strong when each load has a clear path into a stable hinge post. First, inspect the post, frame, rails, and fasteners. Next, lift and square the gate before fixing any brace. Then, place a wood compression brace from the lower hinge corner toward the upper latch corner. Strong hinges and compatible exterior fasteners hold that shape. Finally, sealed cuts, good drainage, and routine checks slow new damage. Ground contact posts also need treatment suited to their exposure. Forest Products Laboratory
Find the Hidden Cause Before You Repair Anything
- Check whether the hinge post moves before blaming the gate frame.
- Look for soft wood, loose joints, rust, drag marks, and an uneven latch gap.
A sagging gate is a symptom, not a full diagnosis. Therefore, adding a cable or moving the latch may hide the real fault. The post may lean. The lower rail may be soft. Corner joints may have opened. Also, wet wood may have changed shape.
Close the gate and study every gap. A narrow top gap and wide bottom gap often show frame racking. Next, push the hinge post gently near the top. Clear movement means the support needs work. Then, test suspect wood with light tool pressure. Sound wood resists, while badly decayed wood feels soft or breaks apart.
Wood swells as it gains moisture and shrinks as it dries. Those cycles can loosen fasteners and shift the latch. Therefore, a repair plan should address both structure and exposure. USDA guidance confirms that moisture changes affect wood performance.
For wider planning on posts, drainage, and gate layout, read this guide to fence installation in Farmers Branch that makes a difference.
Build a Rock Solid Gate Post Foundation
- Replace a post when decay or splitting prevents safe hinge support.
- Set the repaired support plumb, firm, and protected from repeated wetting.
The hinge post carries the gate every day. Therefore, no frame repair can overcome a post that twists or rocks. First, remove the gate load with blocks or temporary support. Next, inspect the post at ground level, near each hinge, and below the cap. These points often collect water or stress.
A lightly weathered post may need hardware work. However, a soft, cracked, or moving post often needs to be replaced. The new post should match the exposure. The American Wood Protection Association places fence posts and other hard-to-replace outdoor components in ground-contact categories when conditions warrant it. Its system also considers repeated wetting, debris, and poor air flow.
Use the AWPA Use Category System to understand why treatment must match service conditions. Follow the lumber label and local rules. A surface coating cannot turn ordinary wood into pressure-treated ground contact material.
Cedar can suit visible gate parts, while the support post may need a different treatment. This guide on cedar wood gates in Farmers Branch offers related material ideas.
Square the Frame for a Dramatic Strength Gain
- Support the latch corner until both frame diagonals match closely.
- Tighten or rebuild corner joints before fixing the new brace.
A brace locks in the shape present during installation. Therefore, never brace a gate while it still sags. First, lift the free corner. Use a level and square to restore the frame. Then, measure from one corner to the opposite corner. Repeat across the other diagonal.
When both measurements match closely, the frame is square. However, measurements do not repair loose joints. Check every rail connection. Replace split pieces, tighten sound joints, and add suitable blocking where more bearing area is needed. Predrill near board ends, since a large screw can split dry wood.
Inspect the pickets or infill boards as well. They should not force the frame out of shape. Wet boards installed too tightly may swell. Heavy trim also adds load at the latch side. Therefore, remove needless weight before adding more steel.
The gate should stay square while supported before the brace carries weight. That order prevents a crooked repair.
Add the Right Brace for Powerful Support
- Run a wood compression brace from the lower hinge corner toward the upper latch corner.
- Fit both brace ends against strong frame members, not weak pickets.
The latch side of a swing gate wants to drop. Therefore, the frame tries to change from a rectangle into a slanted shape. A compression brace resists that change by carrying force back toward the lower hinge area. The brace must bear firmly at both ends.
Keep the gate square with temporary support. Next, mark the brace angle and cut each end for close contact. Then, secure it with exterior fasteners suited to the wood and frame thickness. Avoid fixing the brace only to thin pickets, since they do not form the main load path.
A cable kit works in tension and usually uses the opposite diagonal. Therefore, identify the system before drilling. Do not copy a cable layout when fitting a wood compression brace.
A wide gate may need a steel frame, added rail, larger hinges, or a double design. Professional sizing is safer than random parts.
Upgrade Fasteners for Safe, Lasting Joints
- Choose screws, bolts, hinges, and brackets approved for the wood treatment and outdoor use.
- Replace rusted or undersized hardware instead of tightening it into damaged wood.
Fasteners are small, yet they decide whether a gate stays together. Moisture can corrode metal, while gate motion can widen holes. Also, some modern wood preservatives can increase corrosion risk for certain metals. USDA research shows that treated wood and metal compatibility affects fastener life and joint strength.
Read the treated wood label and hardware instructions. Stainless steel or suitable galvanized hardware may fit many jobs, but the exact choice depends on treatment and exposure. Avoid mixing metals that may react badly when wet.
Use through bolts with washers where hinge loads are high and the frame allows them. Washers spread force across more wood. However, do not crush the fibers by overtightening. If a screw hole is stripped, a larger screw alone may only delay failure.
Predrill near edges. Keep fasteners away from cracks. Finally, give each hinge enough sound wood on both the post and frame. A strong hinge attached to weak wood remains a weak joint.
Replace Weak Wood Before Rot Spreads
- Remove wood that no longer carries load with confidence.
- Seal fresh cuts and use replacement wood suited to its exposure.
Cosmetic filler cannot restore a badly decayed rail. Therefore, separate surface flaws from structural damage. Small checks may only need cleaning and finish. In contrast, soft rail ends, crushed hinge areas, and deep decay near joints often require replacement.
Cut back to firm wood when a sound splice is practical. Use long bearing surfaces and strong mechanical fasteners. Also, shape the repair so water can drain. Replace the whole rail or stile when the remaining piece cannot form a reliable joint. A gate that protects a pool, pet area, or secure yard deserves a cautious choice.
Pressure treated parts should match their use. Cuts and holes may expose less protected inner wood, so follow the supplier’s field care directions. The EPA notes that wood preservative products control decay, mold, and wood destroying insects, but their use can involve health and environmental risks. Always follow the label.
The EPA overview of wood preservative chemicals gives useful background for safe product choices.
Block Water for Remarkable Long Term Stability
- Keep the gate clear of soil, wet leaves, sprinklers, and standing water.
- Seal end grain and finish dry wood with a product made for outdoor exposure.
Water control is structural care. Therefore, the lower gate edge should clear the grade through its full swing. Soil should not touch the wood. Also, nearby sprinklers should not soak the same post each day. Clear leaves and mulch so the post base can dry.
Fresh end grain absorbs water fast. Consequently, cut ends deserve care before final assembly. USDA finishing guidance recommends sealing end grain and explains that outdoor finishes protect wood from water, sunlight, and weather. It also warns that paint is not a preservative when decay conditions remain favorable.
Apply finish only when the wood is clean and dry enough for the chosen product. Follow the maker’s spread rate, weather limits, and drying time. A thick coat over damp wood can fail early. In addition, coat hidden repair faces when the label allows.
For more planning, see these wood fence staining and sealing practices. You can also review how Dallas weather affects fence longevity.
Tune Hinges and Latches for Smooth, Secure Use
- Align hinge pins so the gate swings without twist or bind.
- Set the latch only after the frame, post, and clearance are stable.
A gate can be strong and still work badly. Therefore, hinge alignment follows the main structural repair. Place a level against the hinge stile. Then, check whether both hinge pins share one vertical line. Misaligned pins force the frame to twist during each swing.
Heavy gates often need long strap hinges or another design that spreads load. However, hardware size must match gate weight, width, and frame strength. More metal does not help when the wood beneath it is cracked.
Test the full swing. Look for grade changes, walls, and boards that rub. Set the latch after the gate moves freely. It should meet without lifting, pushing, or slamming. Also, add a positive stop so wind does not force the hinges beyond their intended travel.
A support wheel can help some gates over smooth, level paving. Yet it should not hide a loose post or weak frame. On rough soil, a wheel may add side force and cause new binding.
Test the Repair and Start a Simple Care Plan
- Open and close the gate many times while watching the post and frame.
- Recheck square, latch gap, fasteners, finish, and ground clearance after the test.
A repair is not complete when the last screw goes in. Remove temporary blocks and let the gate carry its weight. Next, open it halfway and watch the hinge post. The post should not twist, lift, or rock. Then, close the gate gently and note the latch position.
Repeat the cycle several times. Listen for creaks and watch each corner. A small change may show a joint settling under load. Therefore, retighten only as needed and avoid crushing the wood.
Check clearance at closed, half open, and full open positions. For a security gate, confirm that the latch stays secure when the gate is pushed. For a pool barrier, follow all local safety rules and use suitable hardware.
Record the repair date and finish. Inspect yearly and after major storms. Photos can reveal slow movement before sag returns.
Costly Mistakes That Can Ruin a Gate Repair
- Never attach a new brace to a loose post or crooked frame.
- Never cover wet, soft, or decayed wood and call the structure repaired.
The first mistake is treating sag as a hinge problem without checking the post. The second is bracing before squaring. The third is using a wood brace in the wrong direction. The fourth is attaching it to pickets instead of the frame.
The fifth mistake is pairing unsuitable hardware with treated wood. The sixth is sealing damp wood. The seventh is moving the latch while the gate still shifts. Each shortcut may look better for a short time. However, the fault returns because the load path remains weak.
Also, avoid adding needless weight through thick trim or heavy plates. Finally, support large gates before removing hinges. A falling gate can damage property and trap hands.
Practical Farmers Branch Repair Example
- This example is illustrative and does not describe a claimed customer project.
- It shows how a root cause repair differs from a quick latch adjustment.
Consider a cedar side gate that drags near the latch corner. The latch misses by half an inch. At first, moving the latch seems easy. However, inspection shows a moving hinge post, a soft lower rail end, two stripped screws, and no compression brace.
The sound sequence starts by supporting and removing the gate. Next, the post is replaced or reset according to its condition. The weak rail is replaced with suitable exterior wood. Then, the frame is squared, the brace is fitted, and compatible hardware is installed. Finally, fresh cuts are sealed and the latch is set after testing.
The lesson is clear. Several small defects can create one visible sag. Therefore, the strongest repair handles them in order. This approach also gives a property manager a clear scope instead of a vague promise to make the gate close.
Clear Signs Replacement May Be Safer Than Repair
- Repair makes sense when sound posts and frame parts can carry the restored load.
- Replacement is safer when decay, movement, or poor design affects most key parts.
A targeted repair can preserve good wood and control cost. However, replacement deserves serious thought when the hinge post fails, several joints are soft, or the frame stays badly warped after unloading. A gate that is far too wide or heavy may also need a new design.
Security and pool gates deserve a lower tolerance for doubt. Compare total cost, not only today’s invoice. A cheap repair that repeats each season may cost more than a sound replacement. A new gate can also correct poor geometry, weak hinge placement, and trapped water details at once.
This guide to five signs it is time to replace a wood gate can support that choice. A professional inspection should explain which parts remain sound and why the proposed option makes sense.
Frequently Asked Questions About Repaired Wood Fence Gates
How do you strengthen a sagging wood fence gate?
First, support the gate and find the true cause. Check the hinge post, frame corners, rails, hinges, and wood condition. Then, square the frame before adding a brace. A wood compression brace normally runs from the lower hinge corner toward the upper latch corner. Finally, align the latch and protect fresh wood from water.
Which way should a brace run on a wooden gate?
For a rigid wood compression brace, run it from the lower hinge corner toward the upper latch corner. That layout carries the dropping latch side toward the supported hinge side. A tension cable uses the opposite diagonal. Therefore, identify the brace type before copying a layout or drilling holes.
Can a rotted wood gate post be repaired?
Minor surface damage may allow a limited repair after the wood dries and weak material is removed. However, a post with deep decay, major splitting, or movement at the base may not support hinge loads safely. Replacement is often the sound choice for a badly weakened post, especially near secure or pool areas.
What fasteners are best for repaired wood fence gates?
Use exterior fasteners that match the wood treatment, hardware guidance, and exposure. Suitable stainless steel or galvanized products are common choices, but compatibility matters. Some treated wood can speed metal corrosion. Therefore, check labels, use washers where loads are high, and replace rusted hardware rather than reusing it.
How often should a repaired wood gate be sealed?
Inspect the finish at least once each year and after severe weather. Recoat when the surface absorbs water quickly, loses protection, or shows wear, while following the product schedule. The right interval changes with finish type, sun, rain, surface texture, and prior preparation. USDA guidance shows that finish life varies widely.
Conclusion: Strong Repairs Start With the Whole Gate
- A stable post and square frame create the base for every lasting repair.
- Correct bracing, compatible hardware, dry wood, and good drainage protect that work.
Improving the strength and stability of repaired wood fence gates requires a full system view. First, find the movement. Next, restore the support. Then, square and brace the frame. After that, upgrade weak hardware and replace wood that cannot carry load.
Moisture control completes the job. Therefore, keep wood clear of soil, seal fresh cuts, and use a suitable exterior finish. Test the gate through its full swing before setting the latch. Finally, inspect the repair before small movement becomes visible sag.
A strong gate should open without lifting, close without force, and remain steady at the post. When a repair achieves those goals, it protects access, privacy, curb appeal, and long term value.
Call to Action
- Request a careful gate inspection and a clear repair scope.
- Ask whether targeted repair or full replacement offers better value.
At Everlast Gates & Fence, we also offer reliable gate and fence services tailored to residential and commercial properties. Specializing in installing, repairing, and maintaining iron and wood gates and fences along with expert solutions for electric gates, automatic gates, sliding gates, and driveway gates. We also provide professional gate diagnostics, access control systems, customized designs, and comprehensive security enhancements to meet your unique needs and let us ensure your gates are in expert hands so you can enjoy safety, style, and convenience with complete peace of mind.
Contact us at
Phone: 469 813 8801
Location: 4099 McEwen Rd # 307, Farmers Branch, TX 75244
Speak with Everlast Gates & Fence about a careful inspection and a clear repair plan for your wood fence gate.
